Stack and Whack™ - A Quilting Tutorial - Page 3
Click on any picture to see a larger, more detailed, version. Pictures will come up in a separate window when you click on them so you won't have to wait for this page to reload.
More piecing...
 Once all the blocks were done, I pinned them to my wall with round-headed pins. The throw-pattern puts the 8 blocks 'on point'. At this point I hadn't decided on a final arrangement. I was intentional about having 4 going clockwise, and 4 going counter-clockwise so I could have SOME symmetry when I started putting it together. Once all the blocks were done, I pinned them to my wall with round-headed pins. The throw-pattern puts the 8 blocks 'on point'. At this point I hadn't decided on a final arrangement. I was intentional about having 4 going clockwise, and 4 going counter-clockwise so I could have SOME symmetry when I started putting it together.
|  To get the triangles that fit in the edge, my instructions said to cut two 22 1/2" squares, and then cut twice on the diagonals. This gives 8 triangles, and you only need 6. This was a unweildy, and a bit of a waste,I thought, so I calculated it out, and made 3 16" squares (that's a tiny bit big, but trimming was easy later) and cut each in half along the diagonals. This was much easier to manage with my ruler and rotary blade. To get the triangles that fit in the edge, my instructions said to cut two 22 1/2" squares, and then cut twice on the diagonals. This gives 8 triangles, and you only need 6. This was a unweildy, and a bit of a waste,I thought, so I calculated it out, and made 3 16" squares (that's a tiny bit big, but trimming was easy later) and cut each in half along the diagonals. This was much easier to manage with my ruler and rotary blade.
|  In making the smaller corner triangles, I had a bit of help *sighs* Move it Smokey! In making the smaller corner triangles, I had a bit of help *sighs* Move it Smokey!
|
Really, you're terribly cute, but your tail is RIGHT in the path of my rotary cutter! 
| Much better! For the corner triangles, cut two 12" squares. You're going to cut them each in half. 
| I lined the sqaure up on my mat with the opposing corners lined up on a vertical line, and lined up my ruler with that. 
|
SLICE! And no cat tails either! 
| When you're all done you'll have 4 triangles for your corners. 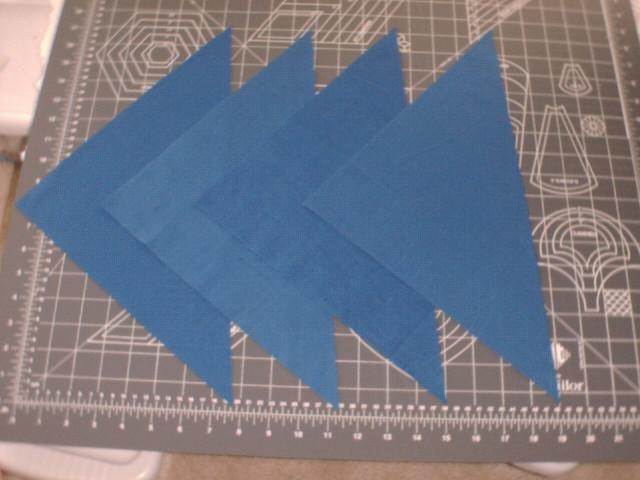
|  Here's the whole thing blocked out on the wall. The triangles are a bit too large, that's fine since I'll trim later - better to have too much and trim, than have too little and cry! At this point I had decided that the center four blocks were going clockwise, and the outer four were going opposite. Like I said, some semblance of symmetry! Here's the whole thing blocked out on the wall. The triangles are a bit too large, that's fine since I'll trim later - better to have too much and trim, than have too little and cry! At this point I had decided that the center four blocks were going clockwise, and the outer four were going opposite. Like I said, some semblance of symmetry!
|
I started looking at backing and border colors at this point ... This is what I eventually picked for the backing. I almost went with it for a border, but decided not to. 
| This slightly patterned yellow looked better next to my top than the solid yellow I had originally bought at the class. It matches the pattern for the backing. 
| Here's a better shot of the fabrics for the backing and accent border. Wal-mart specials! 
|
The kitten took this opportunity to bring in a LARGE cat toy to play fetch with. I couldn't resist putting it in here. 
| She will play fetch with toy mousies and this big fluffy thing for MANY times in a row before she tuckers out. 
| I got a quilting break from her, so so do you! 
|
Okay - back to work! When putting together adjacent blocks, first line up the points you want to match! 
| Pin those exact points together carefully so you'll know when you get there when sewing. You want the points of the kaleidescope to get stitched right next to. So put the pin through that point on one side, and then through the exact point on the opposing side. 
| A close up of the pinning. 
|
Another angle of the same thing. You're going to remove the pin just as you are about to sew over that point, so it's okay that it's in the path of where you'll sew. If you want matched points, this is where you spend the time paying attention. I don't think it took much more effort or time to do this carefully and right, btw - but the results were sure worth it! 
| Now, line up the corners - stretch and make them match! Then pin. 
| Here are two blocks, pinned and ready to sew. 
|
Here I am, getting up to the center where I want to make sure I hit my exact mark for matching the points. The pin is inserted where I need my stitching to go. I did this slowly so as to be accurate, but it wasn't that slow really - only a few stitches need slow accuracy! You might want to look at the large pics of this process if you aren't sure about this. 
| If you look at the close up here, you can see there's a pin going parallel to the edge to hold the material in place, and then the perpindicular pin, marking the exact spot to stitch through. 
| I used the fly-wheel to get as close as I could and pulled the pin out just before it made got stitched over - I held the tip in the spot though, until the very next stitch was going to go in the right spot. After that, just stitch with abandon to the end! 
|
After piecing the blocks together, you need to put the edge (not the corners yet!) triangles on. Line up the edges the way they're supposed to be. Careful to get the correct edge of the trainge along your edge :) 
| Flip it over. The stitching edge is on the left here. 
| Line up the corners and edges. If you made your triangles a little too big, you can afford to be less careful since you can just trim the excess. 
|
Here it is, pinned, from the other side. 
|
Main Stack and Whack™ page
Next